NextAgency helps you track and find a log of all events that occur within a specific case or for the entire agency. Activity log history gives you a pulse on what's going on. It helps answer: "Who, from my agency, is doing what with such and such client?"
Update (3/11/2020): we help describe the new activity log tab in this video.
In NextAgency, you can find a log of all events that occur within a specific case on the Activities tab.
On the Activities tab of a case, you can do the following:
View all activity records related to this case.
Filter the activities by users, contacts, and creation date.
Search for specific activities.
Select the number of activity records to display on the page.
In NextAgency, you can view activities not only for a specific case but also for the entire agency. To do that, in the navigation pane, click Fast Access > Activities.
On this page, you have options similar to those at the case-specific tab:
View the records of all the activities that took place within your agency.
Filter the activities by cases, users, contacts, and creation date.
Search for specific activities.
Select the number of activity records to display on the page.
A carrier credential is the login information about the broker or agent, which is stored in NextAgency. To open the Carrier Credentials page:
1. In the navigation bar, click Fast Access > Carrier Credentials.
Here you can see a list of all carrier credentials that have been created in NextAgency, with their names, types, settings, and available actions.
Adding a Carrier Credential
To add a new carrier credential, follow these steps:
In the upper-right corner of the page, click Add New.
In the Add New Broker ID dialog that opens, specify the following information:
Carrier: Select the carrier for which you are adding the ID.
Name: Enter the name of the broker or agency.
Type: Select the type of the carrier, either Broker or Agency.
Agent/Broker ID: Enter the ID of the agent or broker.
Carrier Site Username: Enter the username that the carrier will specify for authorization with NextAgency.
Carrier Site Password: Enter the password that the carrier will specify for authorization with NextAgency.
Carrier Site URL: Enter the carrier website URL.
After you click Save, the carrier ID will appear in the list.
Managing Carrier Credentials
The following carrier credential management options are available in the carrier credentials list:
Preview carrier credential information.
Edit carrier credential information.
Delete carrier credential information.
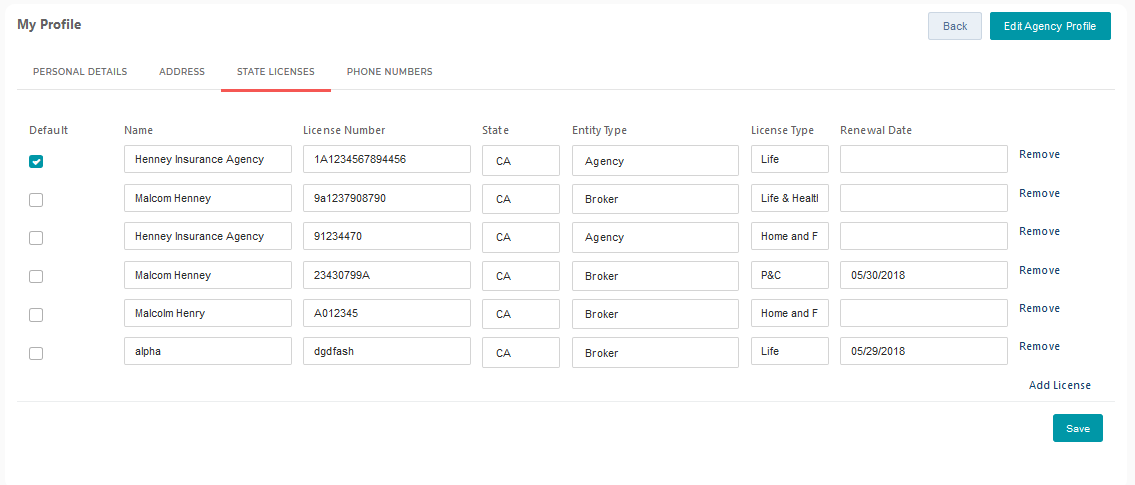
To start managing the state licenses, follow these steps:
In the upper-right corner of any NextAgency page, click your profile icon and choose View Profile.
On the My Profile page that opens, go to the State Licenses tab.
On the State Licenses tab, you can see a list of all licenses that have been created in NextAgency, with the following data:
Default: Select this option if you want to set this license as default in NextAgency.
Name: The name of the agency that holds the license.
License Number: The ID of the license.
State: US state where this license is valid.
Entity Type: Type of the license holder - either Agency or Broker.
License Type: Services for which this license is valid.
Renewal Date: Date on which the license should be renewed.
Remove: Click this link to delete the license records from the list.
Add License: Add a new license record to the list (an empty line will appear).
You can edit the license records directly in the list.
NextAgency is a powerful platform with a host of features. When you integrate NextAgency with third-party tools, however, it can do even more. NextMarket is where we list our integrations with third-party products and services.
There are four types of integrations:
API Integrations enable extensive, automatic sharing of data between the platforms.
Connections make it easier to send or receive data with these platforms (for example, census forms produced in a required format, cases created directly from forms or importing of emails).
Merge Tools enable you to populate forms and documents with data from NextAgency.
Syncing enables sharing of data such as emails, calendar events and contacts.
One of these Connections is through Zapier, a platform which allows you to create connections between NextAgency and thousands of software tools without coding.
NextAgency enables you to quickly and easily create Mail Merge documents using Word. These can then be converted to other formats like PDFs.
To begin creating Mail Merge documents, please follow the below steps:
1. How to set up the Word document for Mail Merge:
Windows Users:
i) Open Microsoft Word on your computer.
ii) Click on "File" and select "New Document" to create a new Word document.
iii) Customize the document formatting according to your requirements.
For example, let's explore a sample format that includes a table. In this document, the first column contains basic information about a case record, while the second column represents dynamic data that will be generated using Mail Merge.
iv) Place your cursor in the field where you want the text to be generated.
v) In Word, click on "Insert" and choose "Quick Parts," then select "Field."
vi) A pop-up window will appear. Please select "MergeField" under Field Names and set the Format to "None."
vii) Enter the desired "Field Name." For instance, if you want to use the field "Primary Contact Email," input "Primary Contact Email" as the Field Name.
viii) Click 'OK' to proceed. The field will be formatted as «Primary Contact Email» in the Word document.
ix) Repeat the same steps for all the fields you wish to fill.
x) Note that special formatting is required for custom fields in NextAgency. Add "Case-Custom" before the custom field name. For example, if you have a case custom field named "Referring Partner," write it as "Case-Custom Referring Partner" in Word.
Mac Users:
i) Launch Microsoft Word on your computer.
ii) Navigate to the "File" from the menu bar and click "New Document" to initiate a fresh Word document.
iii) Customize the document formatting according to your requirements.
iv) To add the field's name, place your cursor in the field where you want the text to be generated. Click on the "Insert" tab and click on "Field". See attached screenshot.
v) Locate "Mail Merge" in the 'Categories' column, and in the adjacent column named 'Field names', select "MergeField".
vi) In the "MergeField" box, enter the field name you desire, enclosing it in quotation marks and using the correct syntax for your specific field. Example: MERGEFIELD "Primary Contact Email". Finally, click "Ok" or press "Enter" and save your document.
vii) Note that special formatting is required for custom fields in NextAgency. Add "Case-Custom" before the custom field name. For example, if you have a case custom field named "Referring Partner," write it as "Case-Custom Referring Partner" in Word.
After defining all the fields in your document, log in to NextAgency to seamlessly finalize the Mail Merge process.
2. To upload the created Word document into NextAgency, please follow these steps:
i) Log in to NextAgency, and go to Settings.
ii) Navigate to the Automations tab and select "Merge Template".
iii) Click on "Add Merge Template" and upload the Word file you created in the steps, above.
iv) On the same page, you will find the 'Merge Template Field Guide' document that comprehensively lists all the supported fields within NextAgency.
3. How to create a Mail Merge document for a case record:
i) Once you have successfully uploaded the Word document, you are ready to generate Mail Merge documents. To initiate the process, please proceed to the Cases/Policies page. Select the desired case records you wish to use for the Mail Merge document (the filter can help you quickly identify the right records). Once you select the records, click on 'Bulk Actions' and choose 'Generate Mail Merge'.
ii) NextAgency will notify you when your merged documents are ready. Click on the notification icon (the globe in the header on every NextAgency page).
iii) Depending on how many Word documents you are creating, this may take a few minutes. Click on the specific notification that your documents are successfully created. NextAgency will download your documents in a zip file. Extract the documents as you normally would.
Should you have any questions or require any assistance, our support team is readily available to help you. Feel free to contact them for any queries you may have by clicking on the green question mark in the header or by email us at Support@NextAgency.com.
This article provides a step-by-step guide on seamlessly integrating your BerniePortal account with NextAgency.
Before proceeding, it's important to highlight that administrative access to your BerniePortal account is required to activate the API.
Upon logging into your BerniePortal account, click on the portrait in the top right corner and select "Account."
Next, access the "Integrations" section from the left side menu. On the "BernieAPI" tab, toggle on NextAgency integration. Upon activation, a unique code (MASTER KEY) will be generated. Simply copy this code for further use.
Once you've obtained the code, please log in to your NextAgency account. On the top right, click on the portrait and then "Settings".
Click on the "Integrations" tab and click on the "BerniePortal" option from the left side menu. To add your account, simply click on "Add Bernie Portal account".
You will be prompted to enter the Master key and an account name. You can paste the previously copied code into the Master Key field. Feel free to give this account any name you like.
Upon completing this step, you'll be directed to a page where you can map your fields. Most mappings will already be pre-configured for you. However, if necessary, you can make adjustments as needed in this section.
Furthermore, you can utilize the provided filters based on your preferences.
Create Renewal Date as effective +1 year: Checking this option will automatically set benefits renewal dates as one year ahead of their effective dates.
Auto Update Benefit Status: Checking this option will automatically update benefit statuses according to their effective and renewal dates.
Sync benefits from effective date: Here you can specify the effective date from which you want to sync all your benefits over to NextAgency.
Once satisfied with your selections, click the option to save. This action will return you to the Integrations page. From here, Click on "Actions" and select the "Sync" option to initiate the sync for Bernie Portal.
It's important to note that syncing for BerniePortal is not automatic. Therefore, if updates are required, simply navigate to Settings > Integrations > BerniePortal > Actions and click on the re-sync option.
Please contact our support team if you require any assistance!
The Employee Navigator integration connects NextAgency to your Employee Navigator account, automatically syncing company, employee, benefit, and dependent data from Employee Navigator into NextAgency. This article walks through the full setup process and explains how to keep your data current after the initial sync.
What syncs from Employee Navigator into NextAgency:
Note: This is a one-way sync from Employee Navigator into NextAgency. Changes made in NextAgency are not pushed back to Employee Navigator. This is a beta implementation, meaning it is continuing to be refined and improved. For example, we'll soon add the ability to add new cases into Employee Navigator from NextAgency.
The sync is manual and per-group — you choose which companies to bring into NextAgency, and re-syncs are triggered by you rather than running automatically in the background.
Requirements
An active Employee Navigator account with API access enabled
Admin Broker access in NextAgency
Step 1: Authorize NextAgency
Log in to your Employee Navigator account.
Click the Add Integration button.
Search for NextAgency and authorize it.
Step 2: Connect Your Employee Navigator Account
In NextAgency, go to Settings → Integrations.
Select the Employee Navigator tab from the integrations sidebar.
Click Add Employee Navigator Account.
You will be redirected to Employee Navigator to authorize the connection. Log in with your Employee Navigator credentials and approve the access request.
After approving, you are redirected back to NextAgency and your account appears in the Employee Navigator Accounts list.
Note: You can connect more than one Employee Navigator account if your agency manages multiple EN instances.
Step 3: Map Fields
Before syncing, you must confirm your field mappings coming from Employee Navigator to the corresponding fields in NextAgency. The mapping screen is divided into three sections — Case, Benefit, and Employee — each corresponding to a data type that can be synced and will usually be already mapped correctly.
Access field mapping by clicking Map Fields on your connected Employee Navigator account.
Case Fields
Maps Employee Navigator company data to NextAgency Case fields. The following field is required and must be mapped:
Field
Why It Matters
Name (required)
Used to create the Case and to match against existing cases in NextAgency. If a case with the same name already exists, it will be updated rather than duplicated.
Additional mappable case fields include company phone, address, SIC code, entity type, broker of record (agency owner), and sales status.
Benefit Fields
Maps Employee Navigator plan data to NextAgency Benefit fields. These fields should be mapped to ensure benefits are created and deduplicated correctly:
Field
Why It Matters
Plan Name
Populates the benefit's plan name in NextAgency. Used to identify the benefit when displaying and reporting.
Carrier
Matched against your NextAgency carrier list by name. Correctly linking a carrier ensures commissions, reports, and carrier-level filtering work as expected.
Product Type
Matched against your agency's product types (e.g., Medical, Dental, Vision). Required for the benefit to appear under the correct product category and for commission splits that are filtered by product type.
Policy Number
Populates the policy number on the benefit record. Important for commission import matching — commissions are reconciled against benefits by policy number.
You can also map Employee Navigator plan configuration data to custom benefit feature fields on your account.
Employee Fields
Maps Employee Navigator employee data to NextAgency Employee fields. The following fields are required:
Field
Why It Matters
First Name (required)
Used to create and identify the employee record.
Last Name (required)
Used to create and identify the employee record.
Additional employee fields, such as date of birth, gender, hire date, and employment status, can also be mapped.
Saving Your Mapping
Click Save when your mappings are complete. The mapping is stored on the integration account and applied every time a sync runs. You can return to this screen to adjust mappings at any time — changes take effect on the next sync.
Step 4: Select Companies to Sync
After saving your field mapping, choose which Employee Navigator companies to bring into NextAgency.
From the Employee Navigator Accounts list, click your connected account.
Click Select Cases. A table lists all available companies with Company Name, State, Last Sync date/time, and Agency Name.
Check the box next to each company you want to sync. Use the header checkbox to select all at once. The Selected counter updates as you go.
Use the search bar to filter if you have many companies.
Click Confirm and Sync. Only the selected companies will be synced.
Tip: You can return to this screen at any time to add or remove companies from your sync selection.
Step 5: Syncing and Re-Syncing
How the initial sync works
After saving your company selection, NextAgency begins syncing in the background. For each selected company, the sync runs in four stages:
Case — Searches for an existing NextAgency case matching the company name (case-insensitive). Updates it if found; creates a new one if not.
Employees — All employees for the company are pulled from Employee Navigator and created or updated in NextAgency as Employee records in the appropriate case. Each employee is matched by their unique Employee Navigator identifier.
Benefits — All benefit plans are pulled and created or updated in NextAgency as Benefit records in the appropriate case. Each plan is matched by its unique Employee Navigator plan identifier.
Dependents — Dependents linked to each employee are created or updated accordingly.
The Last Sync column on the Select Cases screen updates when each company finishes. The sync runs entirely in the background.
Re-syncing
NextAgency has no automatic background syncing for this integration. If you need to trigger a re-sync to pull in updated data, open the connected account and select the Re-Sync option from the account actions. Please note that only selected companies will be included in the sync.
How existing records are handled on re-sync
Cases, employees, and benefits are matched by their Employee Navigator identifier before updating — re-syncing will not create duplicates.
Empty fields in NextAgency are filled in from Employee Navigator; fields that already have a value in NextAgency are not overwritten if Employee Navigator sends a blank.
Records are not deleted from NextAgency when removed from Employee Navigator — removals must be handled manually in the specific case record.
Frequently Asked Questions
Does Employee Navigator sync automatically once it is connected?
No. The Employee Navigator integration is manual and per-group. After you connect your account, nothing pulls into NextAgency until you select companies on the Select Cases screen and click Confirm and Sync. Re-syncs are also triggered manually from the connected account. There is no overnight or background job.
Will Employee Navigator create duplicates if my groups and employees are already in NextAgency?
NextAgency matches the incoming Employee Navigator company to an existing case by name (case-insensitive). If the names match, the existing case, employees, and benefits are updated rather than duplicated. If a name has drifted between the two systems, a new record can be created. When you are syncing a company for the first time, it is worth a quick name check before clicking Confirm and Sync.
Can I run Employee Navigator and Ease at the same time?
Technically yes, but we do not recommend it. The Ease integration is a blanket sync — it does not let you pick specific groups to leave alone — so if the same group is active on both Ease and Employee Navigator, the two will overwrite each other. The cleanest setup is to complete your move from Ease to Employee Navigator on the benefits-admin side first, disconnect Ease from NextAgency, and then connect Employee Navigator.
If I disconnect Ease, will I lose anything in NextAgency?
No. Disconnecting Ease does not delete cases, employees, case notes, benefits, or any history. The records stay; the sync simply stops.
Can I see an employee’s full history after I switch from Ease to Employee Navigator?
Yes. Because the Employee Navigator sync matches on name, the employee in NextAgency stays the same underlying record — same case associations, notes, tasks, and policy history. The Ease-era and Employee Navigator-era data sit on a single record, so the full timeline is preserved in one place.
Do I need to migrate every group at once?
No. Because Employee Navigator is per-group, you can bring companies into NextAgency one at a time (or in batches) as each group finishes its move on the Employee Navigator side. Many agencies start with one or two smaller groups as a pilot, confirm the sync looks clean, and work through the rest from there.
How long does my Employee Navigator connection stay active?
For security, the Employee Navigator connection is active for about one hour at a time. If you are syncing a large number of companies, you may need to reconnect from Settings → Integrations and continue.
Troubleshooting
The "Add Employee Navigator Account" button is not visible
The Employee Navigator integration must be enabled on your NextAgency subscription. Contact support if you do not see the option.
Authorization failed or the redirect did not return to NextAgency
Ensure you are logged in to Employee Navigator with an account that has API access. If the issue persists, try the flow again from a fresh browser session.
No companies appear on the Select Cases screen
This can occur if the authorization did not complete successfully, or if the connected EN account has no companies. Try disconnecting and reconnecting the account.
Benefits are syncing without a carrier or product type
Return to Map Fields and confirm that Carrier and Product Type are mapped. The carrier match is case-insensitive but must be an exact name match against your NextAgency carrier list. Product type must match an existing product type on your account.
A company synced, but employees or benefits are missing
The sync runs in stages — employees and benefits are processed after the case completes. Wait a few minutes and check the Last Sync timestamp. If data is still missing, trigger a manual re-sync.
I see duplicate cases or employees after syncing
Cases are matched by name (case-insensitive). Duplicates usually happen because the group name in Employee Navigator does not match the group name already in NextAgency (often from a prior Ease sync or manual entry). Rename the company in Employee Navigator or in NextAgency so the two match, then re-sync. For duplicate employees, check that first and last names match between the two systems.
The connection timed out mid-sync
For security, the Employee Navigator session is active for about an hour. If you are syncing many companies, you may need to reconnect and resume. Reconnect from Settings → Integrations → Employee Navigator, then trigger the sync again — already-synced companies will pick up where they left off rather than duplicate.
A group I expected to see is missing from the Select Cases list
The Select Cases screen only shows companies your Employee Navigator account has API access to. If a group is missing, confirm in Employee Navigator that the company is fully provisioned and that the account you authorized has access to it.
If you have any questions, please contact our support team.
Integrating your phone and agency management systems boosts both platforms. For client calls, you can instantly access contact info and NextAgency records. When in NextAgency, just click the phone number to place a call. Of course, you need the right platforms: NextAgency for your agency management system, and Intulse for your VOIP phone system. This article details how to set up and make the most of their connection. Please note that this is a beta launch, meaning new features and fixes will be coming soon.
Please Note: To keep your calls and recordings logged in NextAgency indefinitely so that they remain even if you intend to remove this integration, please save them. For more details, please read the last section of this article, "Saving Calls & Recordings".
How to set up Intulse:
To begin the integration process, the first step is to either sign in or sign up for Intulse and obtain the Master Key. To locate the Master Key in Intulse, click on the 'More' option, followed by 'API Access.' On this page, you will find the Organization API Key. Copy this key for later use.
After acquiring the Master Key, proceed to log in to NextAgency. Within NextAgency, navigate to Settings > Integrations > Intulse (located in the left side menu). In the provided field, paste the previously copied 'Master Key,' and then click 'Save' to complete the integration setup.
How to use Intulse in NextAgency:
Calls:
After completing the integration process, you can begin utilizing Intulse within NextAgency for making calls and sending messages.
To get started with Intulse in NextAgency, the first step is to enable the 'Virtual Phone' feature in your Intulse settings.
Once 'Virtual Phone' is activated, navigate to either the Contacts icon or the Contacts tab within a case record in NextAgency. Click on Actions > View, and you'll notice a new dedicated tab for Intulse. Within this tab, simply click on 'Start Call' to initiate a call directly from NextAgency. Your browser will then notify you as the call is initiated. You will need to ensure that your browser notifications are turned on.
Below is a snapshot demonstrating the initiation of calls within Intulse. To initiate a call, simply click on the green button.
Text Messages:
Efficiently communicate with your Contacts via Text Messages by navigating to the Text Messages tab on the left-hand side and selecting the 'Send Message' option.
Compose your message and click 'Send' when you're ready.
To receive notifications for incoming text messages, go to Settings > Agency Settings > Preferences > Personal > Intulse, and check the box for 'When New Message Received.'
The Intulse tab in NextAgency will store all the data related to your calls and messages.
Saving Calls & Recordings:
After the call has begun, simply tap the back button. Then, when you're on the Intulse page, click on 'Call Actions' > 'Start Recording' to begin recording the call.
After finishing the call, you can locate the recording file attached to the call under the appropriate contact record in the Intulse tab. Remember to click on the actions menu of the call record if you want to save it.
If you have questions, please reach out to our support team at support@nextagency.com
NextAgency offers a wide variety of integrations to help you do more, more quickly, with automation. This includes making available to you our API and integration through the Zapier platform. This article describes how to connect NextAgency with other software platforms through Zapier.
Zapier makes it easy to move data between two software applications. We use workflows ("zaps") to help automatically move data between NextAgency and other software programs. For example, you can connect NextAgency to Calendly and automatically create a lead when someone sets-up an appointment with you.
There are literally hundreds of software platforms in the Zapier community. By automating repetitive tasks, we help you gain greater value from both NextAgency and other software you use. The result: you save time and money.
Here's how to automate your daily tasks in NextAgency with Zapier:
Request an invite to our Zapier integration. Simply click on the Help button at the bottom right of any page in NextAgency or send an email to support@nextagency.com stating your interest in integrating with Zapier. This must be done by an Administrative Broker or their designee. Our support team will send you the invitation.
Use this invitation in Zapier to confirm your authority to link with NextAgency
Go to My Apps in Zapier and select NextAgency.
Zapier will ask you to provide a NextAgency API key so the app can connect to your NextAgency account.
To get the API key, in the blue navigation pane select Fast Access and then click on the Settings link. On the Agency Settings > Profile page copy the key from the Zapier API Key fiel.
Paste the key in the API Key field in Zapier and click Yes, Continue.
NextAgency will appear under My Apps. You can test the integration as well as reconnect or disconnect it.
Connect NextAgency to Another Software Application
Now you can create workflow that connect NextAgency with other software platforms. Let's say you want to create a lead in NextAgency each time someone uses Calendly to schedule an appointment with you. Follow these steps:
In your Zapier account, open the navigation pane and click Make a Zap.
In the upper-left corner of the page, type a name for your zap (for example, "Calendly Leads").
Under When this happens... > Choose App & Event, search for Calendly and choose the app from the search results.
Under Choose Trigger Event, select Invitee Created, and then click Continue.
Sign in to your Calendly account.
Under Do this..., select NextAgency for Choose App, Create Lead for Choose Action Event, and then click Continue.
Under Choose Account, sign in to your NextAgency account or select the account if you're already signed in, and then click Continue.
Customize the lead and click Continue.
Zapier will check the data and then test the connection.
Our APIs make it easy to customize NextAgency for your company. From creating new leads to custom apps for backend data, we'll walk you through the tools you need to build new integrations and extend the power of NextAgency. While our Zapierintegration gives you the ability to sync NextAgency with over 3500+ application in the Zapier marketplace, users may find that their use case requires more sophistication and complexity than a simple "if this happens, then do that". In a nutshell, Zapier is a one-way workflow, while APIs are two-way.
For example, suppose you have a large general agency, and you've built your own custom proprietary process to manage your clients and your agency's workflow.
Use Case Example #1:
It's renewal season. You've received PDF proposals from Anthem for your group's renewal. Your staff logs them into the customer's record within your legacy system.
You're using NextAgency as well, however. Your NextAgency portal informs the customer via SMS and Email that their renewal is ready. PDFs stored in your legacy system are also stored simultaneously in NextAgency.
NextAgency also notifies your own internal team that a renewal proposal from Anthem has been received and queues a task (with pre-set notification alerts) for your support team to call the customer. After the call, your rep posts a disposition/outcome of the call within NextAgency, which automatically posts the same exact note in your own legacy system.
Use Case Example #2:
Your agency uses a VOIP solution such as RingCentral or Five9. When your agency receives an inbound call, you would like the customer's record to automatically pull up in your NextAgency portal, and additionally see an overlay window whereby you can input the call disposition (ie: notes/outcome). The disposition is then stored, complete with date/timestamp to your customer's record, as well as a recording of the conversation in .mp3/wav format (assuming opt-in compliance).
In addition, you'd like to make sure that when you access a customer record, that you're able to click on a contact's phone number and automatically pull up your VOIP window. Any information entered in this window will also be stored in your VOIP's platform.
As you can see, tapping into NextAgency's API can unleash a world of new functionality and workflow that previously was hidden.
We have resources for each API to help you understand their use case, how to build with them, and a complete API reference. If you have any questions, feel free to reach out to us at support@nextagency.com.